How to configure a TypeScript + WebPack project in Visual Studio Code

If you develop in Angular or React or similar client side JavaScript framework, it's not common to have a CLI (Command Line Interface) that does the project scaffolding.
This is very convenient: simply installing an npm package, you are able to easily create a blank project. These CLIs over time are enriched, so that they ask you more and more parameters so that the project is created according to your needs.
Usually the created project has excellent integration with VS Code, providing the possibility to start debugging from the IDE and enabling hot-reload, so that when you save your project, the browser is automatically refreshed with the new content.
But: what if you want to add these features to a TypeScript project created manually, without the support of various CLIs?
I admit that the task is not absolutely easy, and I also needed help, that very thankfully came from my colleague Sébastien Vandenberghe.
In this blog post I want to:
- start with a very sample html page with some inline JavaScript;
- convert the JavaScript to TypeScript, so that our custom code is checked at compile-time;
- introduce WebPack for module bundling and use NodeJS to run the app, including cool features like hot-reloading;
- integrate with the Visual Studio Code IDE for automatically launch debug builds and integrate with the debugger.
The initial project
As starting project, I want to start with a minimal html page containing some JavaScript libraries: JQuery and JQueryUI.
I create a folder named VSCodeWebPack that will host the project and inside it an index.html file that will contain everything.
As I am not a very good html designer, I have literally copied the JQueryUI Accordion example, replacing the JavaScript files with CDN resources and copying locally the custom css file.
index.html
<!doctype html>
<html lang="en">

<head>
	<meta charset="utf-8">
	<meta name="viewport" content="width=device-width, initial-scale=1">
	<title>jQuery UI Accordion - Default functionality</title>
	<link rel="stylesheet" href="https://code.jquery.com/ui/1.12.1/themes/base/jquery-ui.css">
	<link rel="stylesheet" href="style.css">
	<script src="https://code.jquery.com/jquery-1.12.4.js"></script>
	<script src="https://code.jquery.com/ui/1.12.1/jquery-ui.js"></script>
	<script>
		$(function () {
			$("#accordion").accordion();
		});
	</script>
</head>

<body>
	<div id="accordion">
		<h3>Section 1</h3>
		<div>
			<p>
				Mauris mauris ante, blandit et, ultrices a, suscipit eget, quam. Integer
				ut neque. Vivamus nisi metus, molestie vel, gravida in, condimentum sit
				amet, nunc. Nam a nibh. Donec suscipit eros. Nam mi. Proin viverra leo ut
				odio. Curabitur malesuada. Vestibulum a velit eu ante scelerisque vulputate.
			</p>
		</div>
		<h3>Section 2</h3>
		<div>
			<p>
				Sed non urna. Donec et ante. Phasellus eu ligula. Vestibulum sit amet
				purus. Vivamus hendrerit, dolor at aliquet laoreet, mauris turpis porttitor
				velit, faucibus interdum tellus libero ac justo. Vivamus non quam. In
				suscipit faucibus urna.
			</p>
		</div>
		<h3>Section 3</h3>
		<div>
			<p>
				Nam enim risus, molestie et, porta ac, aliquam ac, risus. Quisque lobortis.
				Phasellus pellentesque purus in massa. Aenean in pede. Phasellus ac libero
				ac tellus pellentesque semper. Sed ac felis. Sed commodo, magna quis
				lacinia ornare, quam ante aliquam nisi, eu iaculis leo purus venenatis dui.
			</p>
			<ul>
				<li>List item one</li>
				<li>List item two</li>
				<li>List item three</li>
			</ul>
		</div>
		<h3>Section 4</h3>
		<div>
			<p>
				Cras dictum. Pellentesque habitant morbi tristique senectus et netus
				et malesuada fames ac turpis egestas. Vestibulum ante ipsum primis in
				faucibus orci luctus et ultrices posuere cubilia Curae; Aenean lacinia
				mauris vel est.
			</p>
			<p>
				Suspendisse eu nisl. Nullam ut libero. Integer dignissim consequat lectus.
				Class aptent taciti sociosqu ad litora torquent per conubia nostra, per
				inceptos himenaeos.
			</p>
		</div>
	</div>
</body>

</html>
style.css
body {
	font-family: Arial, Helvetica, sans-serif;
}

table {
	font-size: 1em;
}

.ui-draggable, .ui-droppable {
	background-position: top;
}
Convert to TypeScript
We want to move the JavaScript code out of the page, and rewrite it in TypeScript, so that it will be type-safe.
We start creating a folder app, and there we create a file names main.ts.
We want to move the code that builds the accordion in main.ts. But if we would do it now, and then try to compile, we would get some errors. To compile successfully we need in fact to provide TypeScript type definitions, that usually come as npm packages.
So from the command line, or the Terminal window of VS Code, we can start writing the following commands (in the main folder, out of the app subfolder):
npm init
npm install jquery
...
In reality, you can copy the following package.json file and then run npm install from the command line or terminal window.
package.json
{
  "name": "vscodewebpack",
  "version": "1.0.0",
  "description": "",
  "author": "",
  "license": "ISC",
  "dependencies": {
    "jquery": "^3.4.1",
    "jquery-ui": "^1.12.1"
  },
  "devDependencies": {
    "@types/jquery": "^3.3.33",
    "@types/jqueryui": "^1.12.10"
  }
}
Now you need to add also a tsconfig.json file, to enable the TypeScript compiler.
tsconfig.json
{
	"compilerOptions": {
		"noImplicitAny": false,
		"noEmitOnError": true,
		"removeComments": false,
		"sourceMap": true,
		"target": "es5",
		"module": "es2015",
		"lib": [
			"dom",
			"es2015",
			"es2015.iterable"
		],
		"strict": true,
		"moduleResolution": "node"
	},
	"exclude": [
		"node_modules",
		"wwwroot"
	]
}
Finally, we can create our app\main.ts, that will contain the application code.
main.ts
import * as $ from 'jquery';
import 'jquery-ui/ui/widgets/accordion';

$(function () {
	$("#accordion").accordion();
});
So we can remove the above code from index.html.
index.html
<!doctype html>
<html lang="en">

<head>
	<meta charset="utf-8">
	<meta name="viewport" content="width=device-width, initial-scale=1">
	<title>jQuery UI Accordion - Default functionality</title>
	<link rel="stylesheet" href="https://code.jquery.com/ui/1.12.1/themes/base/jquery-ui.css">
	<link rel="stylesheet" href="style.css">
	<script src="https://code.jquery.com/jquery-1.12.4.js"></script>
	<script src="https://code.jquery.com/ui/1.12.1/jquery-ui.js"></script>
</head>

<body>
	<div id="accordion">
		<h3>Section 1</h3>
		<div>
			<p>
				Mauris mauris ante, blandit et, ultrices a, suscipit eget, quam. Integer
				ut neque. Vivamus nisi metus, molestie vel, gravida in, condimentum sit
				amet, nunc. Nam a nibh. Donec suscipit eros. Nam mi. Proin viverra leo ut
				odio. Curabitur malesuada. Vestibulum a velit eu ante scelerisque vulputate.
			</p>
		</div>
		<h3>Section 2</h3>
		<div>
			<p>
				Sed non urna. Donec et ante. Phasellus eu ligula. Vestibulum sit amet
				purus. Vivamus hendrerit, dolor at aliquet laoreet, mauris turpis porttitor
				velit, faucibus interdum tellus libero ac justo. Vivamus non quam. In
				suscipit faucibus urna.
			</p>
		</div>
		<h3>Section 3</h3>
		<div>
			<p>
				Nam enim risus, molestie et, porta ac, aliquam ac, risus. Quisque lobortis.
				Phasellus pellentesque purus in massa. Aenean in pede. Phasellus ac libero
				ac tellus pellentesque semper. Sed ac felis. Sed commodo, magna quis
				lacinia ornare, quam ante aliquam nisi, eu iaculis leo purus venenatis dui.
			</p>
			<ul>
				<li>List item one</li>
				<li>List item two</li>
				<li>List item three</li>
			</ul>
		</div>
		<h3>Section 4</h3>
		<div>
			<p>
				Cras dictum. Pellentesque habitant morbi tristique senectus et netus
				et malesuada fames ac turpis egestas. Vestibulum ante ipsum primis in
				faucibus orci luctus et ultrices posuere cubilia Curae; Aenean lacinia
				mauris vel est.
			</p>
			<p>
				Suspendisse eu nisl. Nullam ut libero. Integer dignissim consequat lectus.
				Class aptent taciti sociosqu ad litora torquent per conubia nostra, per
				inceptos himenaeos.
			</p>
		</div>
	</div>
</body>

</html>
If you would try to open the page now in a browser, it wouldn't work, because there is nothing invoking main.ts from index.html yet.
Introducing WebPack
Now it's time to introduce WebPack, that acts both as module bundler and module loader.
For this, we will add webpack.common.js, webpack.dev.js and webpack.prod.js; clearly the first file contains common configurations, and the other two files additional configurations specific for development and release builds.
webpack.common.js
"use strict";

const path = require('path');

const HtmlWebpackPlugin = require('html-webpack-plugin');

module.exports = {
	entry: './app/main.ts',
	output: {
		filename: '[name].js',
		chunkFilename: 'vendor.js',
		path: path.resolve(__dirname, 'dist')
	},
	resolve: {
		extensions: ['.tsx', '.ts', '.js']
	},
	module: {
		rules: [
			{
				test: /\.tsx?$/,
				use: 'ts-loader',
				exclude: /node_modules/
			}
		]
	},
	plugins: [
		new HtmlWebpackPlugin({
			template: './index.html'
		})
	],
	optimization: {
		splitChunks: {
			chunks: 'all'
		}
	}
};
webpack.dev.js
const merge = require('webpack-merge');
const common = require('./webpack.common.js');

module.exports = merge(common, {
	mode: 'development',
	devtool: 'source-map'
});
webpack.prod.js
const merge = require('webpack-merge');
const common = require('./webpack.common.js');

const { CleanWebpackPlugin } = require('clean-webpack-plugin');

module.exports = merge(common, {
	mode: 'production',
	plugins: [
		new CleanWebpackPlugin()
	]
});
These script require multiple npm packages, to be used only during development time. So we will add them in package.json in the devDependencies section.
package.json
{
  "name": "vscodewebpack",
  "version": "1.0.0",
  "description": "",
  "author": "",
  "license": "ISC",
  "dependencies": {
    "jquery": "^3.4.1",
    "jquery-ui": "^1.12.1"
  },
  "devDependencies": {
    "@types/jquery": "^3.3.33",
    "@types/jqueryui": "^1.12.10",
    "clean-webpack-plugin": "^3.0.0",
    "express": "^4.17.1",
    "html-webpack-plugin": "^3.2.0",
    "ts-loader": "^6.2.1",
    "typescript": "^3.8.3",
    "webpack": "^4.42.0",
    "webpack-cli": "^3.3.11",
    "webpack-dev-middleware": "^3.7.2",
    "webpack-dev-server": "^3.10.3",
    "webpack-merge": "^4.2.2"
  }
}
After updating this file, remember to run npm install from the command line or terminal window.
Finally, we want to compile our application, and to do this, we add two scripts to the usual package.json file.
package.json
{
  "name": "vscodewebpack",
  "version": "1.0.0",
  "description": "",
  "author": "",
  "license": "ISC",
  "scripts": {
    "start": "webpack-dev-server --config webpack.dev.js --hot --open",
    "build": "webpack --config webpack.prod.js"
  },
  "dependencies": {
    "jquery": "^3.4.1",
    "jquery-ui": "^1.12.1"
  },
  "devDependencies": {
    "@types/jquery": "^3.3.33",
    "@types/jqueryui": "^1.12.10",
    "clean-webpack-plugin": "^3.0.0",
    "express": "^4.17.1",
    "html-webpack-plugin": "^3.2.0",
    "ts-loader": "^6.2.1",
    "typescript": "^3.8.3",
    "webpack": "^4.42.0",
    "webpack-cli": "^3.3.11",
    "webpack-dev-middleware": "^3.7.2",
    "webpack-dev-server": "^3.10.3",
    "webpack-merge": "^4.2.2"
  }
}
One last thing: the HtmlWebPack automatically injects in index.html the bundled JavaScript files, so we can remove them as well.
index.html
<!doctype html>
<html lang="en">

<head>
	<meta charset="utf-8">
	<meta name="viewport" content="width=device-width, initial-scale=1">
	<title>jQuery UI Accordion - Default functionality</title>
	<link rel="stylesheet" href="https://code.jquery.com/ui/1.12.1/themes/base/jquery-ui.css">
	<link rel="stylesheet" href="style.css">
	<script src="https://code.jquery.com/jquery-1.12.4.js"></script>
	<script src="https://code.jquery.com/ui/1.12.1/jquery-ui.js"></script>
</head>

<body>
	<div id="accordion">
		<h3>Section 1</h3>
		<div>
			<p>
				Mauris mauris ante, blandit et, ultrices a, suscipit eget, quam. Integer
				ut neque. Vivamus nisi metus, molestie vel, gravida in, condimentum sit
				amet, nunc. Nam a nibh. Donec suscipit eros. Nam mi. Proin viverra leo ut
				odio. Curabitur malesuada. Vestibulum a velit eu ante scelerisque vulputate.
			</p>
		</div>
		<h3>Section 2</h3>
		<div>
			<p>
				Sed non urna. Donec et ante. Phasellus eu ligula. Vestibulum sit amet
				purus. Vivamus hendrerit, dolor at aliquet laoreet, mauris turpis porttitor
				velit, faucibus interdum tellus libero ac justo. Vivamus non quam. In
				suscipit faucibus urna.
			</p>
		</div>
		<h3>Section 3</h3>
		<div>
			<p>
				Nam enim risus, molestie et, porta ac, aliquam ac, risus. Quisque lobortis.
				Phasellus pellentesque purus in massa. Aenean in pede. Phasellus ac libero
				ac tellus pellentesque semper. Sed ac felis. Sed commodo, magna quis
				lacinia ornare, quam ante aliquam nisi, eu iaculis leo purus venenatis dui.
			</p>
			<ul>
				<li>List item one</li>
				<li>List item two</li>
				<li>List item three</li>
			</ul>
		</div>
		<h3>Section 4</h3>
		<div>
			<p>
				Cras dictum. Pellentesque habitant morbi tristique senectus et netus
				et malesuada fames ac turpis egestas. Vestibulum ante ipsum primis in
				faucibus orci luctus et ultrices posuere cubilia Curae; Aenean lacinia
				mauris vel est.
			</p>
			<p>
				Suspendisse eu nisl. Nullam ut libero. Integer dignissim consequat lectus.
				Class aptent taciti sociosqu ad litora torquent per conubia nostra, per
				inceptos himenaeos.
			</p>
		</div>
	</div>
</body>

</html>
We can finally run our application, executing from the command line or terminal window:
npm start
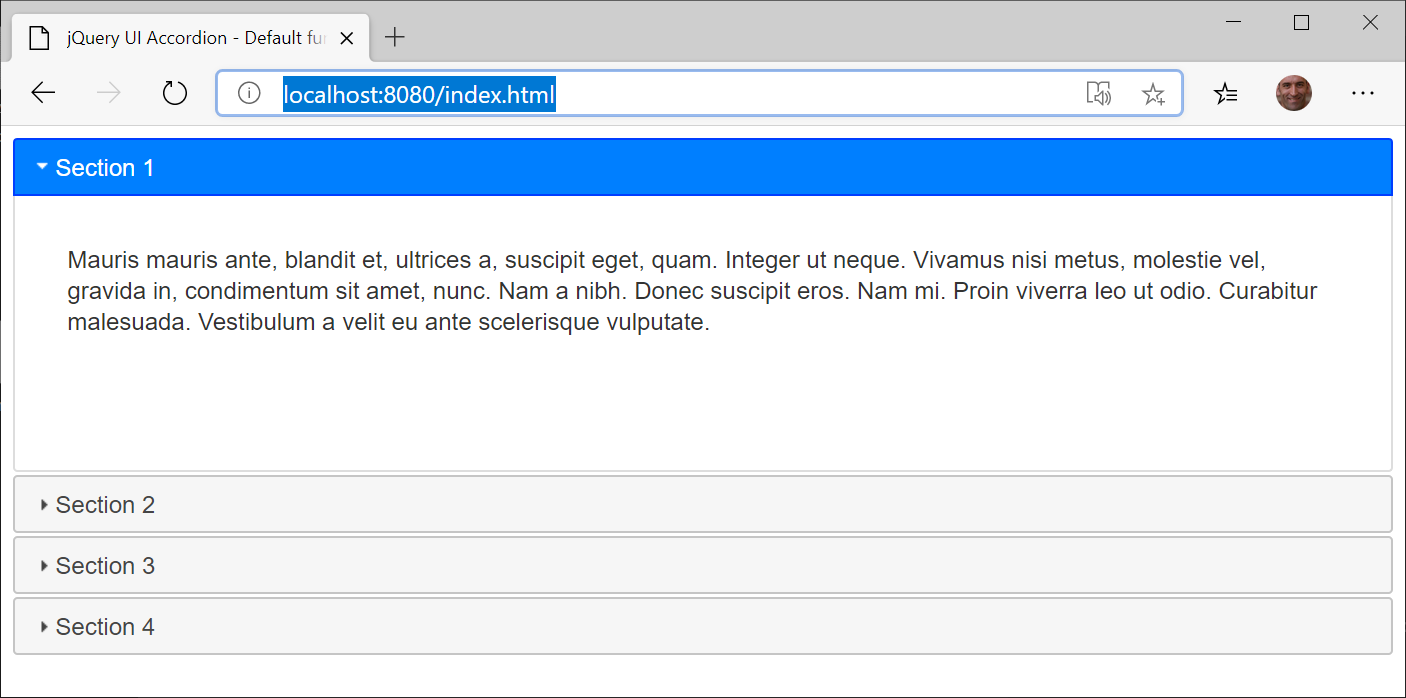
This will open the default browser pointing to http://localhost:8080/.
Try also to change some text in index.html, or add an alert in main.ts: in both cases, you will see that the application get recompiled and the browser window get updated automatically (note: this is true for TypeScript files; for html files, you need to refresh the browser manually).
Once our application is complete, we can generate the publishing bundle executing:
npm run build
This will create the dist folder with the bundled index.html, and the two JavaScript files vendor.js (containing the JQuery libraries) and main.js.
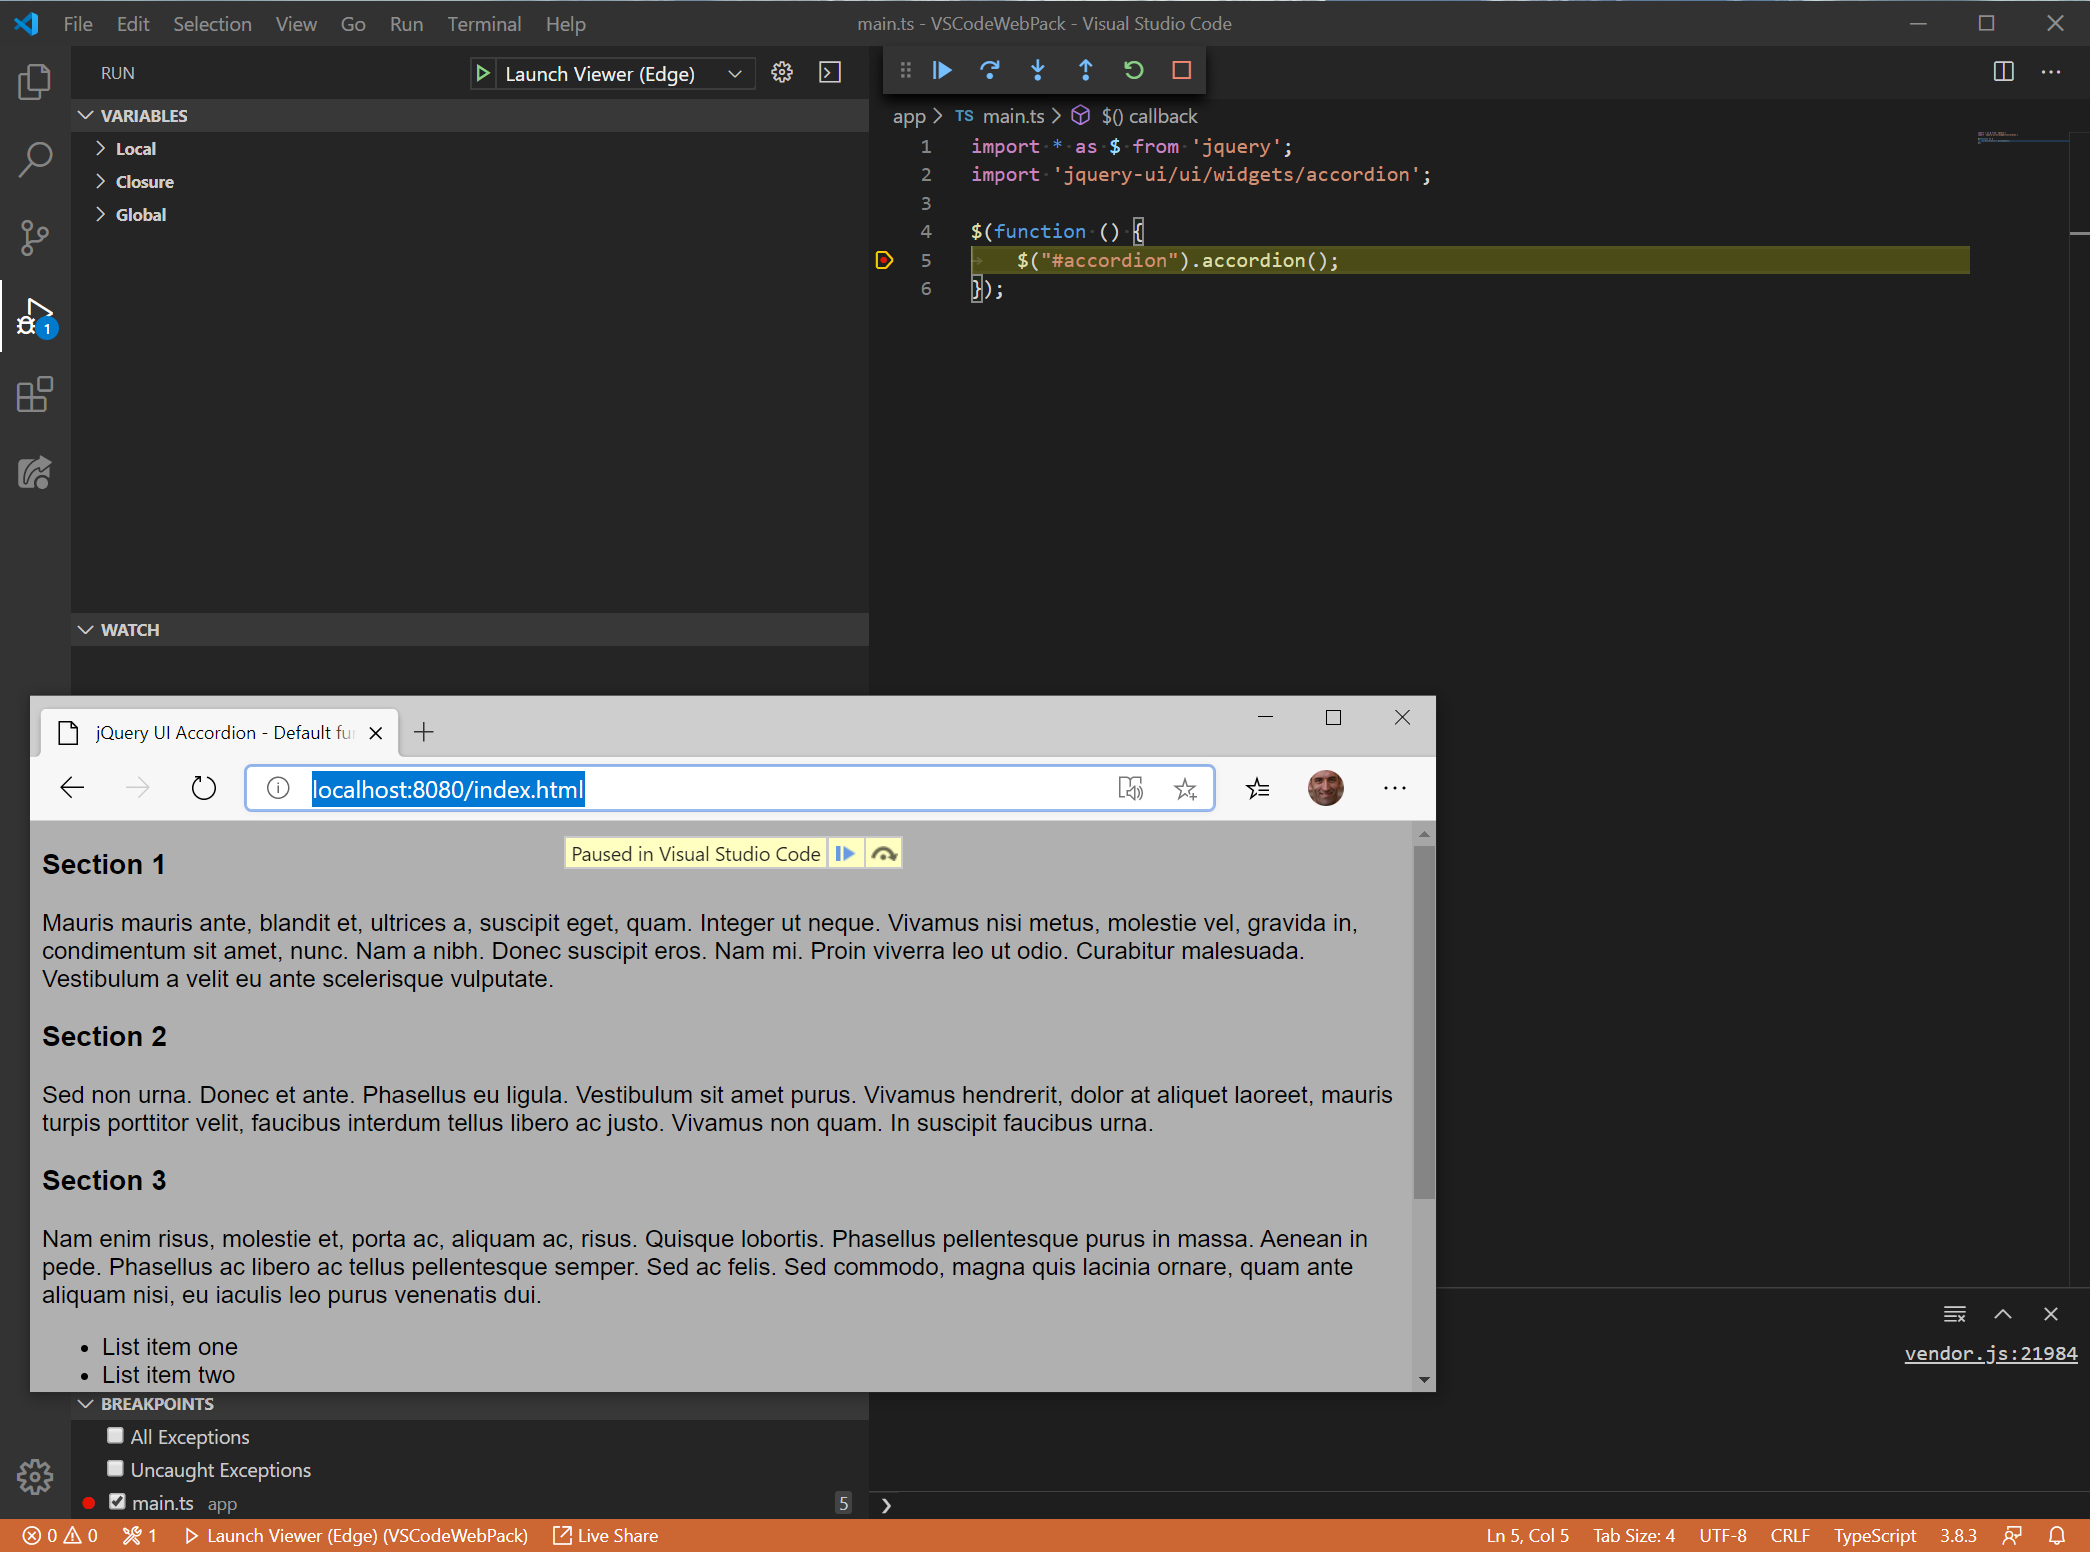
Integration with VS Code
For integration with VS Code, we need to create a .vscode folder at root level.
Inside this folder you need to create two files.
launch.json
{
// Use IntelliSense to learn about possible attributes.
// Hover to view descriptions of existing attributes.
// For more information, visit: https://go.microsoft.com/fwlink/?linkid=830387
"version": "0.2.0",
"configurations": [
{
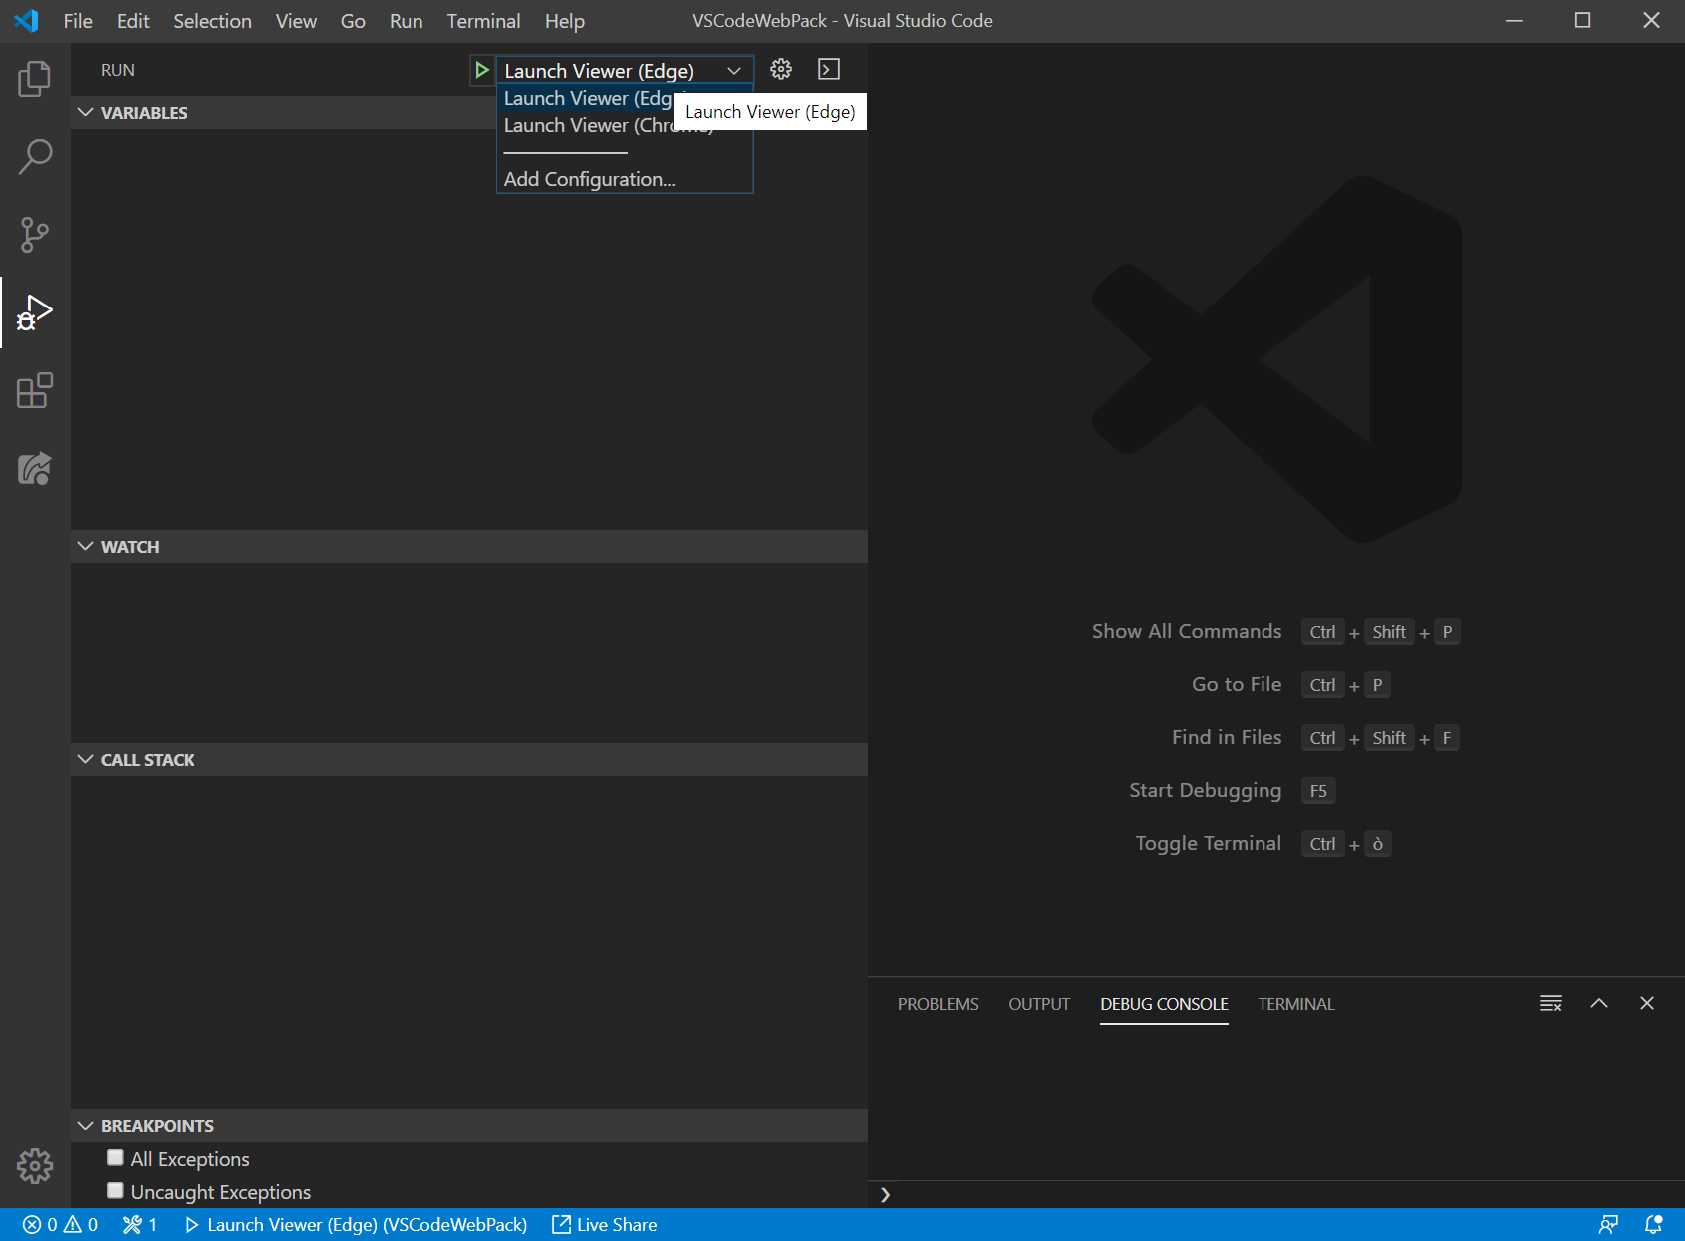
"name": "Launch Viewer (Edge)",
"type": "edge",
"version": "dev",
"request": "launch",
"url": "http://localhost:8080/index.html",
"webRoot": "${workspaceRoot}/",
"sourceMaps": true,
"preLaunchTask": "start",
"userDataDir": "${workspaceRoot}/.tempEdgeProfileForDebug",
"runtimeArgs": [
"--enable-unsafe-es3-apis"
]
},
{
"name": "Launch Viewer (Chrome)",
"type": "chrome",
"request": "launch",
"url": "http://localhost:8080/index.html",
"webRoot": "${workspaceRoot}/",
"sourceMaps": true,
"preLaunchTask": "start",
"userDataDir": "${workspaceRoot}/.tempChromeProfileForDebug",
"runtimeArgs": [
"--enable-unsafe-es3-apis"
]
},
]
}
tasks.json
{
	// See https://go.microsoft.com/fwlink/?LinkId=733558
	// for the documentation about the tasks.json format
	"version": "2.0.0",
	"tasks": [
		{
			"label": "start",
			"type": "npm",
			"script": "start",
			"group": {
				"kind": "build",
				"isDefault": true
			},
			"isBackground": true,
			"problemMatcher": {
				"owner": "typescript",
				"fileLocation": "relative",
				"pattern": {
					"regexp": "^([^\\s].*)\\((\\d+|\\,\\d+|\\d+,\\d+,\\d+,\\d+)\\):\\s+(error|warning|info)\\s+(TS\\d+)\\s*:\\s*(.*)$",
					"file": 1,
					"location": 2,
					"severity": 3,
					"code": 4,
					"message": 5
				},
				"background": {
					"activeOnStart": true,
					"beginsPattern": "Project is running at",
					"endsPattern": "Compiled successfully"
				}
			}
		}
	]
}
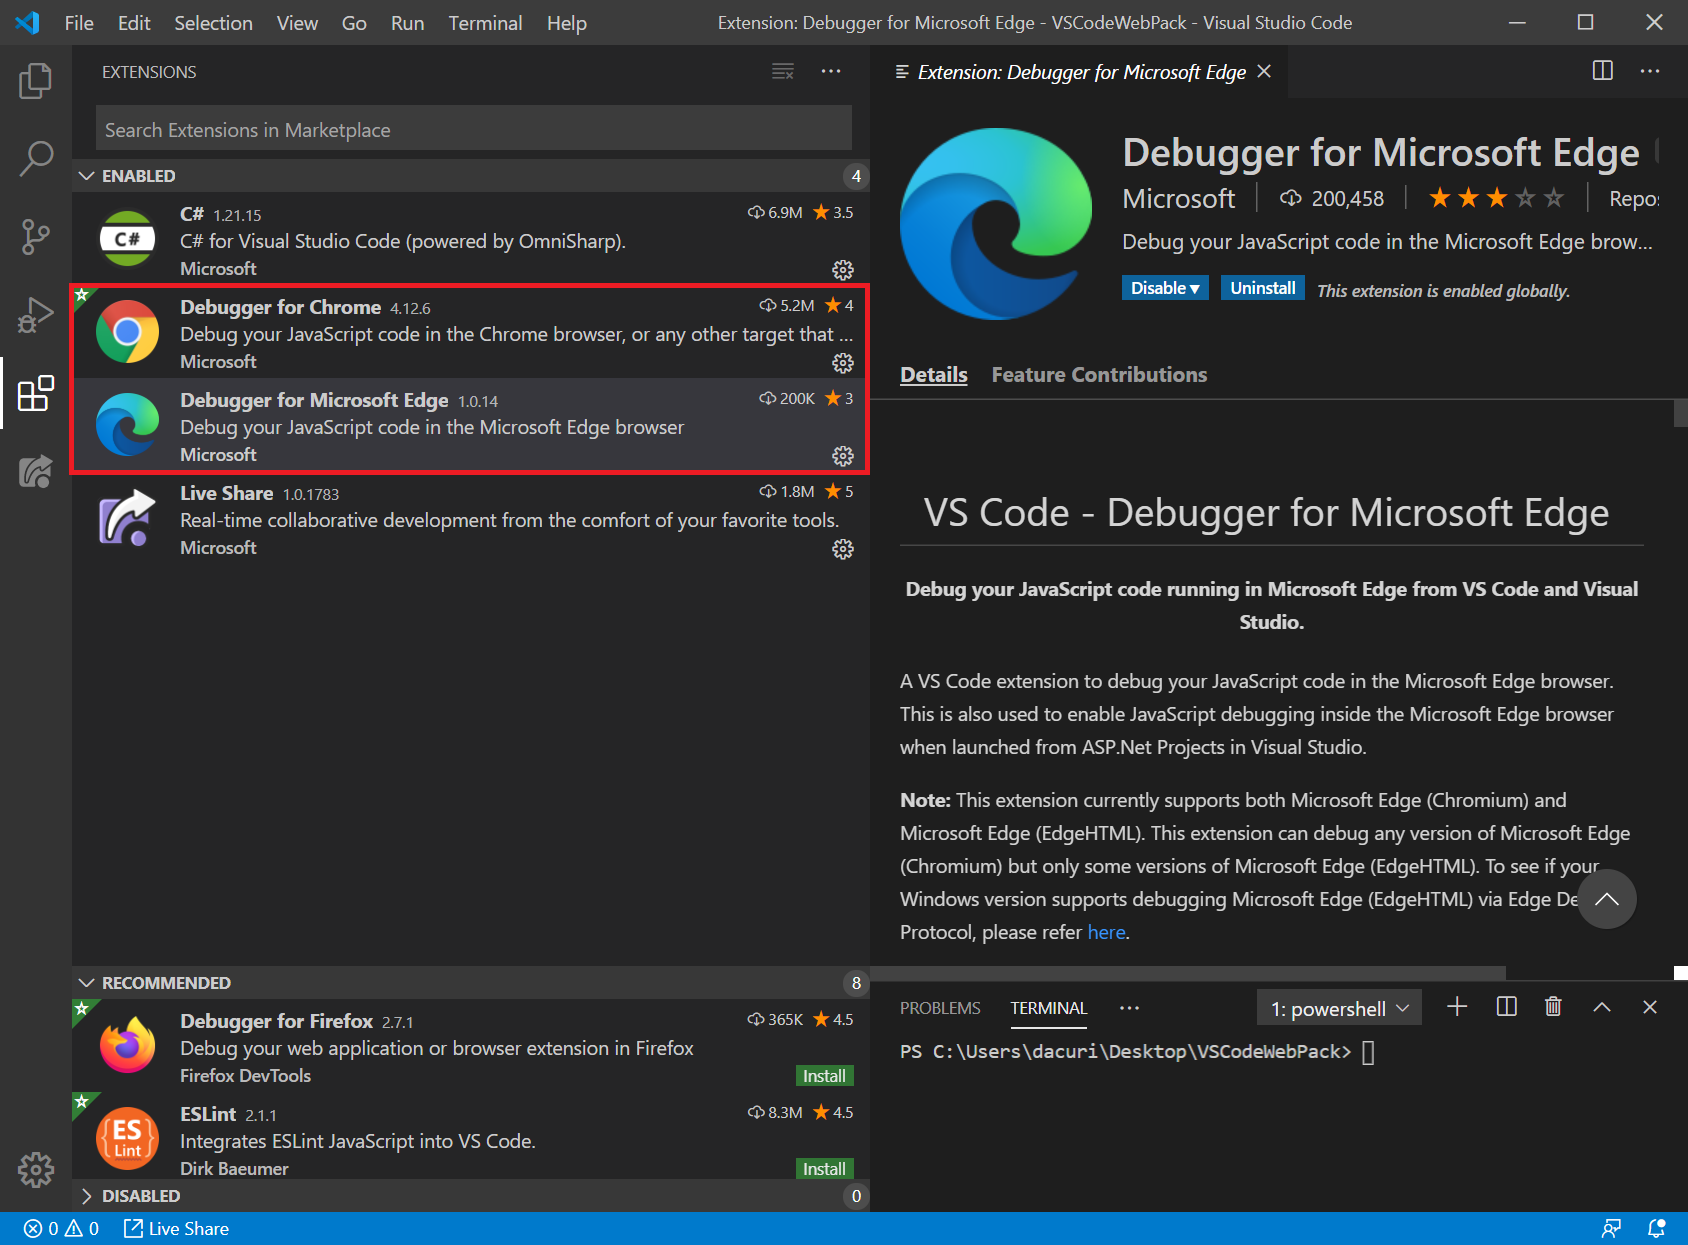
One last step: you will need to install the VS Code extensions Debugger for Microsoft Edge and/or Debugger for Chrome.
Also: these extensions automatically open the browser window, so you don't need the flag --open in the script anymore. So you can remove it from package.json.
package.json
{
  "name": "vscodewebpack",
  "version": "1.0.0",
  "description": "",
  "author": "",
  "license": "ISC",
  "scripts": {
    "start": "webpack-dev-server --config webpack.dev.js --hot",
    "build": "webpack --config webpack.prod.js"
  },
  "dependencies": {
    "jquery": "^3.4.1",
    "jquery-ui": "^1.12.1"
  },
  "devDependencies": {
    "@types/jquery": "^3.3.33",
    "@types/jqueryui": "^1.12.10",
    "clean-webpack-plugin": "^3.0.0",
    "express": "^4.17.1",
    "html-webpack-plugin": "^3.2.0",
    "ts-loader": "^6.2.1",
    "typescript": "^3.8.3",
    "webpack": "^4.42.0",
    "webpack-cli": "^3.3.11",
    "webpack-dev-middleware": "^3.7.2",
    "webpack-dev-server": "^3.10.3",
    "webpack-merge": "^4.2.2"
  }
}
Finally we can start debugging directly from Visual Studio Code.
Verify that you can set breakpoints in main.ts and the debugger correctly stops there.